


Hitchhikers guide to the Databricks AI Dev Kit
Introduction
Are we heading toward a world where your AI dev environment understands your entire data platform by default? That is the promise behind the Databricks AI Dev Kit: not just helping an assistant write code, but helping it write code with real awareness of the Databricks environment it is meant to run in.
That distinction matters. Most AI coding tools are good at producing plausible code, but platform work is rarely about plausibility. It is about using the right APIs, following the right patterns, and understanding the services, data, and workflows that already exist around you. The Databricks AI Dev Kit narrows that gap by combining two especially useful ideas for local development: MCP and skills.
With MCP, a local AI client can connect to real Databricks capabilities instead of guessing from memory. With skills, the assistant gets platform-specific guidance for common Databricks tasks, nudging it toward better patterns and more reliable output. Together, they make local development feel less like prompting a general-purpose chatbot and more like working with an assistant that actually understands your Databricks workspace.
That is what makes the AI Dev Kit compelling: it gives your local AI setup both hands and judgment. MCP lets it interact with the platform. Skills help it know what good looks like. And when those two come together, building locally becomes faster, more grounded, and a lot less dependent on trial and error.
But… Genie code?
You might or might not have heard of Genie Code, the rebrand from its predecessor, the Databricks Assistant. We too are a bit confused sometimes, because what do you use for what, and where does each offering sit exactly?
The simplest way to think about it is this: Genie Code sits inside Databricks as the native, higher-level agent experience for data and AI work, while the AI Dev Kit sits in your local development environment, helping tools like Claude Code, Cursor, or Gemini work better with Databricks. Databricks describes Genie Code as an “autonomous AI partner for data work,” deeply integrated with Unity Catalog, Databricks APIs, and workspace experiences, while the AI Dev Kit is the toolkit that brings MCP tools and skills into external coding assistants.
Here is a small comparison table we’ve created:
| Aspect | Databricks AI Dev Kit | Genie Code |
|---|---|---|
| What it is | A toolkit that helps external AI coding assistants work better on Databricks. | Databricks’ own autonomous AI partner for data and AI work. |
| Where it lives | In your local development environment (i.e. VSCode), alongside tools like Claude Code, Cursor, or Gemini CLI. | Inside the Databricks platform as a native agent experience. |
| How it works | Combines an MCP server, skills, and core Python tooling to make your chosen assistant more Databricks-aware. | Uses an agentic system with deep integration into Databricks APIs, Unity Catalog, and workspace tools. |
| Best fit | Teams that want to keep using their preferred editor and coding assistant, but with better Databricks grounding. | Teams that want a more opinionated, Databricks-native autonomous agent for end-to-end data work. |
| Typical workflow | Best for local repo-based development, MCP-powered actions, and code generation in your existing toolchain. | Best for delegating broader workflows such as building pipelines, debugging failures, and maintaining data systems. |
What the AI Dev Kit actually adds
Before we install anything, it helps to understand what the Databricks AI Dev Kit actually adds to your local environment. At a high level, it combines tools, skills, and project wiring. The MCP server gives your AI client executable access to Databricks capabilities; the skills package teaches it Databricks-specific patterns; and the project-level config files make that context available inside Claude Code, VS Code, or other supported clients. In the official repo, Databricks describes this as a toolkit for coding agents, with an MCP server exposing 50+ tools and a set of 20 markdown skills for common Databricks workflows.

Why MCP matters for Local Development
MCP is one of the most important ideas in the kit because it gives your local AI client a way to interact with real capabilities instead of guessing from static training data. In practice, that means your assistant can rely on executable tools exposed through the Databricks MCP server rather than trying to “remember” how a Databricks workflow should look. The official repo explicitly positions the MCP server as the piece that provides executable actions for AI assistants.
For local development, that is a big improvement. Without MCP, an assistant can still generate plausible code, but plausibility is not the same as platform awareness. With MCP in the loop, the assistant becomes more grounded in actual Databricks operations and can work with a better understanding of the environment it is supporting. That makes the local workflow feel less like trial-and-error prompting and more like working alongside a tool that can actually navigate the platform with you.
Why ‘Skills’ matter just as much
You might have heard of ‘Skills’ before. If MCP gives the assistant hands, then skills give it judgment. The skills package in the AI Dev Kit is designed to teach Databricks-specific patterns and best practices, so the model does not just produce something that compiles, but something that reflects how work is commonly done on the platform. Databricks even offers “Skills Only” as a standalone path in the repository for teams that want the guidance without the MCP actions.
That is especially valuable in local development, where a lot of friction comes from repeated context-setting. You want the assistant to understand how to structure a pipeline, how to think about governance, or how to approach a Databricks-native application without having to restate those patterns every time. Skills help reduce that friction by packaging platform know-how into reusable guidance that travels with the project.
Installation
The official repository recommends installing the AI Dev Kit at the project level by default. That is an important design choice. It means the installation is tied to the folder where you are working, and your AI client needs to be run from that same directory for the configuration to apply correctly. Databricks notes that this project-scoped setup is often a good fit and that configuration files live under directories such as .claude, .cursor, or .gemini. In thi guide, we decided to go with Claude Code for obvious reasons. All installations in this guide are based on Mac with bash and homebrew. For Windows, we suggest to look up the equivalent Powershell and/or Winget commands yourself.
Prerequisites
Before installing the Databricks AI Dev Kit itself, you need three things in place: uv, the Databricks CLI, and at least one supported AI coding environment. In the official repository, Databricks lists uv, the Databricks CLI, and an AI coding tool such as Claude Code, Cursor, or Gemini CLI as the core prerequisites.
Because this guide is focused on a local developer workflow, we would install these in that order: first uv, then the Databricks CLI, then your AI client. That gives you the Python toolchain, the Databricks connection layer, and finally the editor or agent interface that will use the AI Dev Kit.
VSCode
This goes without saying, you need an IDE for local development. We prefer VSCode.
uv
If there is one tool at the center of the setup experience, it is uv. The official quick start lists uv as a prerequisite right alongside the Databricks CLI and an AI coding environment such as Claude Code, Cursor, or Gemini CLI. That is a strong signal that Databricks expects uv to be part of the normal installation path, not an optional extra.
That makes uv the right lens for a setup guide. It is the foundation for getting the Python-based parts of the AI Dev Kit into your environment cleanly and consistently. If your goal is a local setup that is fast, reproducible, and easy to reason about, starting from uv is the most natural way to explain the install story.
uv is the Python package manager used throughout the Databricks AI Dev Kit setup. Astral’s official installation page recommends the standalone installer on macOS with the following command:
brew install uv.
Databricks CLI
The official Databricks CLI installation docs recommend Homebrew on macOS too. The documented installation commands are:
brew tap databricks/tap
brew install databricks
Configuring Databricks authentication
After the CLI is installed, the next prerequisite is authentication. The Databricks CLI uses configuration profiles, and Databricks documents profiles as the standard way to store and reuse workspace connection settings. Run databricks auth login to begin your authentication. It will prompt you for a name, workspace url and PAT token.
Install an AI coding environment
In this guide we expect you to already have one installed. We went with Claude Code here.
Quick verification checklist
Before moving on to the Databricks AI Dev Kit installation, you should be able to run these commands successfully in a fresh terminal session:
uv --version
databricks version
databricks auth profiles
claude --version (if you also chose Claude Code as your AI client).
This gives you confidence that the Python toolchain, the Databricks connection layer, and the AI environment are all ready.
Install the Databricks AI Dev Kit
With the prerequisites in place, the next step is to install the actual Databricks AI Dev Kit into the project you actually want to work in. The official repository recommends a project-level installation by default, which is usually the right choice because it keeps the MCP configuration, skills, and related settings attached to the codebase rather than your entire machine. Databricks also notes one important consequence of that choice: you need to run your AI client from the exact directory where the install was performed, because that is where the project-scoped configuration lives.
That detail is worth emphasizing because it explains a lot of setup confusion before it happens. If the install succeeds but you later open a different folder in your editor or terminal, your AI assistant may no longer see the MCP setup or the project-specific guidance. In other words, installation is not just about putting files on disk; it is about installing them in the right working directory.
Now go ahead and run (from the root of your project folder!):
bash <(curl -sL https://raw.githubusercontent.com/databricks-solutions/ai-dev-kit/main/install.sh)
It will check the installation prerequisites as well here:
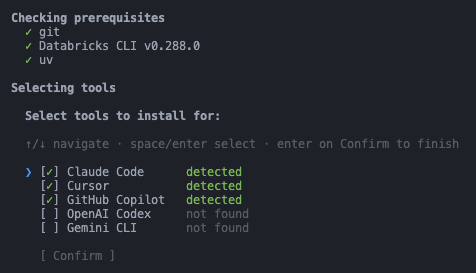
Go ahead and confirm the local AI of choice here. Again, in this article we went with Claude Code.
At a high level, this step is wiring your local AI environment into the core parts of the repository: the MCP server, the skills package, and the project-specific configuration that tells supported clients how to use them. The README’s “What’s Included” section describes these components as databricks-mcp-server for executable assistant tools, databricks-skills for markdown-based guidance, databricks-tools-core for reusable Python functions, and databricks-builder-app for a full-stack chat development experience.
Next, it will ask you which Databricks profile to use, choose the one you’ve set up in the prerequisites earlier. After this step, make sure to select ‘Project’ as we spoke about earlier.

After this, it will prompt you to select which skills you want to install. We suggest just doing ‘All skills’, because why not 🙂
It will now prompt you for a the MCP server location. Keep the default MCP server location and press Enter. This installs the shared Python runtime for the MCP server in a central folder on your machine, while the project-specific configuration stays inside your current repository.
Proceed with the installation by just confirming the last part. It will set up the MCP server, install the skills, authenticate using the profile, etc. Your VSCode should now should an .ai-dev-kit and .skills directory.
Let’s test it out!
Well, great success, you have now installed the and configured the Databricks AI Dev Kit, but let’s find out if it works shall we?
Try by prompting Claude Code (or your own AI): list all my schema’s and tables in catalog x. You can do this via the Claude Code CLI or official VSCode extension (I quite like that one!)
If all is right, you should now get a response. Here are some other prompts:
- Create a Databricks Job that runs notebook x daily at 6 AM.
- Help me scaffold a Spark Declarative Pipeline for bronze to silver ingestion.
- Show me the best pattern for building an AI/BI dashboard on Databricks.
- Generate a Databricks App starter structure for this use case.
These prompts are useful because they test both halves of the AI Dev Kit. The assistant needs the MCP tools to interact with Databricks capabilities, and it needs the skills layer to respond with Databricks-specific patterns rather than generic code.
Final thoughts
The Databricks AI Dev Kit is interesting not because it promises better autocomplete, but because it points toward a better development model. Instead of asking a general-purpose assistant to guess its way through a complex data platform, the kit gives that assistant more context, more structure, and a much better sense of how Databricks work is actually done.
That is where MCP and skills really earn their place. MCP makes the assistant more grounded by connecting it to real capabilities. Skills make it more useful by steering it toward Databricks-specific patterns and workflows. Put those together, and local development starts to feel less like prompt engineering and more like working with a tool that understands the terrain.
That is also why a uv-first setup makes sense. It keeps the installation practical, reproducible, and close to the way many developers already manage Python-based tooling. And when you combine that with a project-scoped install, the result is a setup that travels with the repo instead of living as mystery configuration somewhere else on your machine.
In that sense, the Databricks AI Dev Kit is not just another developer utility. It is a small glimpse of where AI development environments seem to be heading: toward assistants that do not just generate code, but understand the platform, the workflow, and the context around the code too.
And that may be the real point of this whole guide. The goal is not simply to install another tool. It is to make your local AI environment a little less lost, and a lot more Databricks-native.
Good to know!
One of the most useful things to understand about the AI Dev Kit is that not every “create a job” prompt means the same thing. Sometimes the assistant can use an MCP tool to create the job directly in Databricks, and sometimes it can help you generate the job definition inside your repo as code, ready to deploy through Databricks Declarative Automation Bundles (DABs) for example. That distinction matters. One path is faster for quick execution; the other is better for version control, review and repeatability. In other words, the real power of the AI Dev Kit is not just that it can help you build on Databricks, it is that it can support both the immediate workflow and the infrastructure-as-code workflow, depending on how you want to work.
Keeping skills and MCP servers updated
Because the Databricks AI Dev Kit installs a shared MCP runtime plus project-level configuration, the easiest maintenance strategy is to periodically re-run the installer with force enabled. The official repository documents force-reinstall options for both macOS/Linux and Windows, and recent release notes indicate that reinstalling with --force is also used to update the MCP server.
A practical rule is to refresh the AI Dev Kit whenever you start a new project, when you notice new skills or MCP capabilities in the repo’s releases, or when your local setup starts drifting from the current README examples. The GitHub releases page is the best place to watch for changes to skills, MCP tools, and installer behavior.
Our personal recommendation would be:
-
Check releases occasionally
-
Re-run install with
--forcewhen needed -
Keep project-scoped configs in the repo
-
Avoid hand-editing shared runtime locations unless necessary


